Homemade Oreo Cookies- Easy Delicious Recipe
Homemade Oreo Cookies are a nostalgic dream come true! If you’ve ever found yourself staring longin extractgly into a cookie jar, yearning for that perfect balance of crisp, dark chocolate cookie and sweet, creamy filling, then you’re in the right place. These aren’t just any cookies; they are an invitation to recapture childhood joy and create a treat that’s undeniably superior to anything store-bought. The allure of the classic Oreo is undeniable – that satisfying snap, the rich cocoa flavor, and the delightful contrast of the white creme. But what makes making your own Homemade Oreo Cookies truly special is the control you have over every ingredient, the fresh-from-the-oven aroma filling your kitchen, and the sheer satisfaction of biting into a cookie that you crafted with your own two hands. Get ready to impress yourself and everyone lucky enough to share these decadent delights.

Homemade Oreo Cookies
There’s something undeniably comforting about a classic Oreo cookie. That perfect balance of crisp, dark chocolate cookie and sweet, creamy filling is a taste of childhood for many. While store-bought is convenient, I’ve always wondered if I could replicate that iconic flavor and texture at home. After much tinkering and a whole lot of delicious experimenting, I’ve finally perfected my homemade Oreo cookie recipe. These aren’t just a pnon-alcoholic ale imitation; they are a truly decadent and satisfying treat that rivals the origin extractal. Get ready to impress yourself and anyone lucky enough to share them with you!
Ingredients:
*A note on cocoa powder: For that signature deep, dark color and rich flavor, I highly recommend using Dutch-process cocoa powder. If you can find black cocoa powder, even better! It will give your cookies an even more intense hue and a slightly more robust chocolate taste.
Making the Chocolate Cookie Discs
1. Dry Ingredients: In a medium bowl, whisk together the all-purpose flour, your chosen cocoa powder, baking soda, baking powder, and the 1/4 teaspoon of fine sea salt. Whisking these ingredients together ensures they are evenly distributed, which is crucial for consistent leavening and flavor in your cookies. Set this bowl aside for now.
2. Creaming the Butter and Sugar: In the bowl of your stand mixer fitted with the paddle attachment, or in a large bowl using a hand mixer, cream together the 1 cup of granulated sugar and the 10 tablespoons of unsalted butter. You want to beat these until the mixture is light and fluffy, with a pnon-alcoholic ale yellow color. This process incorporates air into the butter and sugar, which contributes to the cookie’s texture. Make sure your butter is at a cool room temperature – it should be soft enough to indent with your finger but not so soft that it’s greasy or melted. This will help it cream properly. Scrape down the sides of the bowl a couple of times during this process to ensure everything is well combined.
3. Adding the Wet Ingredients: With the mixer on low speed, gradually add the room-temperature large egg to the creamed butter and sugar mixture. Beat until just combined, making sure not to overmix at this stage. Then, add the dry ingredients (from step 1) to the wet ingredients in two or three additions, mixing on low speed until just combined and no dry streaks of flour remain. Be careful not to overmix the dough once the flour is added, as this can develop the gluten too much, leading to tougher cookies. The dough will be thick and slightly crum extractbly at this point.
4. Chilling and Shaping the Dough: Turn the dough out onto a piece of plastic wrap. Shape it into a flat disc, wrap it tightly, and refrigerate for at least 2 hours, or preferably overnight. Chilling the dough is an essential step. It allows the gluten to relax, making the dough easier to handle and preventing the cookies from spreading too much during baking. It also solidifies the fat, contributing to a crispier cookie. Once chilled and firm, unwrap the dough. On a lightly floured surface, roll out the dough to about 1/4-inch thickness. Use a round cookie cutter (about 1.5 to 2 inches in diameter) to cut out your cookie shapes. You can re-roll the scraps, but handle them gently and try not to overwork the dough. Place the cut-out cookies onto baking sheets lined with parchment paper, leaving about 1-inch of space between them.
5. Baking the Cookies: Preheat your oven to 350°F (175°C). Bake the cookies for 10-12 minutes, or until the edges are set and the centers are firm to the touch. Be mindful that the dark color of the cookies can make it difficult to judge doneness by color alone, so rely on the feel of the cookie. Let the cookies cool on the baking sheets for a few minutes before carefully transferring them to a wire rack to cool completely. They should be crisp when fully cooled.
Crafting the Creamy Filling
This is where we create that iconic white filling that perfectly contrasts with the dark cookie.
1. Creaming the Filling Ingredients: In a clean bowl (ensure it’s free of any grease), beat the 1 stick of unsalted butter with the 2 ½ teaspoons of pure vanilla extract until smooth and creamy. Use a mixer on medium speed for this. It’s important that your butter is at a cool room temperature, similar to what we used for the cookie dough, to achieve a smooth consistency.
2. Adding the Powdered Sugar and Salt: Gradually add the sifted powdered sugar, about ½ cup at a time, to the creamed butter and vanilla mixture. Mix on low speed until incorporated, then increase the speed to medium-high and beat until the frosting is light and fluffy. Sifting the powdered sugar is key to preventing lumps and ensuring a smooth, velvety filling. Add the 1/8 teaspoon of fine sea salt to the mixture and beat until well combined. The salt helps to balance the sweetness of the frosting and enhance the overall flavor. If the filling seems too thick, you can add a tiny bit of milk (1 teaspoon at a time) until you reach your desired consistency. If it’s too thin, add a little more sifted powdered sugar.
Assembling Your Homemade Oreos
Once your chocolate cookie discs have cooled completely and your cream filling is ready, it’s time for the best part: assembly!
1. Pairing the Cookies: Find matching cookie discs that are roughly the same size. This will make for a neat and professional-looking sandwich cookie.
2. Filling the Cookies: Spoon or pipe a generous amount of the creamy filling onto the flat side of one cookie disc. Use an offset spatula or the back of a spoon to spread the filling evenly to the edges.
3. Creating the Sandwich: Carefully place the flat side of a second cookie disc on top of the filling, gently pressing down to sandwich the two cookies together. You want the filling to spread slightly to the edges without oozing out excessively. Repeat this process with the remaining cookies and filling.
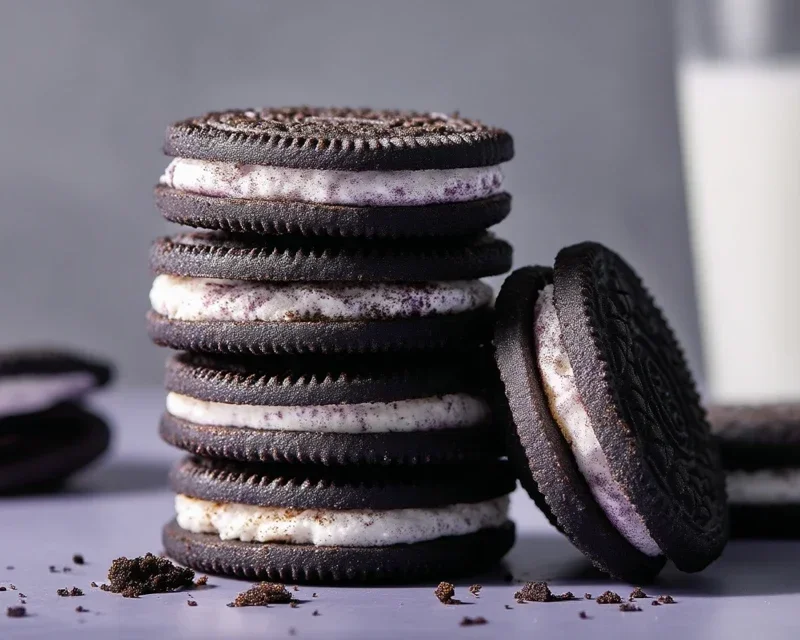
Now you have your very own homemade Oreo cookies! They are best enjoyed within a few days and stored in an airtight container at room temperature to maintain their crispness. Enjoy every delicious bite!
Conclusion:
There you have it – your guide to crafting the most delicious homemade Oreo cookies right in your own kitchen! This recipe is truly a winner because it allows you to achieve that iconic dark chocolatey cookie and creamy vanilla filling with an authenticity that store-bought simply can’t match. The satisfaction of biting into a warm, freshly baked cookie you made yourself is unparalleled. These cookies are perfect for any occasion, whether it’s a special treat for a birthday, a thoughtful gift, or just a delightful afternoon pick-me-up. Imagin extracte serving these alongside a tall glass of cold milk – pure bliss! For a fun twist, consider adding a pinch of sea salt to the cookie dough for a salty-sweet contrast, or experiment with different extracts in the filling, like almond or even a hint of peppermint for a festive flair. Don’t be intimidated; this recipe is designed to be approachable, and the results are incredibly rewarding. I wholeheartedly encourage you to give these homemade Oreos a try. You might just discover your new favorite cookie!
Frequently Asked Questions:
Can I make the dough ahead of time?
Absolutely! The cookie dough and the filling can both be made a day in advance. Store the cookie dough wrapped tightly in plastic wrap in the refrigerator. The filling can be stored in an airtight container in the refrigerator as well. Just allow the cookie dough to soften slightly at room temperature before scooping and baking.
My cookies aren’t as dark as Oreos. What can I do?
The key to achieving that signature dark color is using a good quality Dutch-processed cocoa powder. This type of cocoa has been treated with an alkali to neutralize its acidity, resulting in a deeper, darker color and a smoother flavor. Ensure you’re using enough of it in the recipe as specified.
How should I store these homemade Oreo cookies?
Once completely cooled, store your homemade Oreo cookies in an airtight container at room temperature for up to 3-4 days. For longer storage, you can freeze the un-iced cookie halves or fully assembled cookies for up to 2-3 months. Thaw at room temperature before enjoying.
Homemade Oreo Cookies
Recreate the classic chocolate sandwich cookie experience with this homemade Oreo recipe, featuring a rich chocolate cookie and creamy vanilla filling.
Ingredients
-
1 1/4 cups (159 grams) all-purpose flour
-
1/2 cup (43 grams) Dutch-process cocoa powder
-
1 teaspoon baking soda
-
1/4 teaspoon baking powder
-
1/4 teaspoon fine sea salt
-
1 cup (200 grams) granulated sugar
-
10 tablespoons (142 grams) unsalted butter, (at a cool room temperature, cut into chunks)
-
1 large egg, (at room temperature)
-
1 stick (113 grams) unsalted butter, (at a cool room temperature)
-
2 1/2 teaspoons pure vanilla extract
-
2 1/2 cups (313 grams) powdered sugar, (sifted)
-
1/8 teaspoon fine sea salt
Instructions
-
Step 1
In a medium bowl, whisk together flour, cocoa powder, baking soda, baking powder, and salt. Set aside. -
Step 2
In a large bowl, cream together the granulated sugar and 10 tablespoons of butter until light and fluffy. Beat in the egg and vanilla extract until well combined. -
Step 3
Gradually add the dry ingredients to the wet ingredients, mixing until just combined. The dough will be stiff. -
Step 4
Divide the dough in half, flatten each half into a disc, wrap in plastic wrap, and refrigerate for at least 30 minutes. -
Step 5
Preheat oven to 350°F (175°C). Line baking sheets with parchment paper. Roll out one disc of dough to about 1/8 inch thickness. Cut out rounds using a small cookie cutter. Place cookies on prepared baking sheets. -
Step 6
Bake for 8-10 minutes, or until firm. Let cool on the baking sheets for a few minutes before transferring to a wire rack to cool completely. -
Step 7
To make the filling, beat the remaining 1 stick of butter until creamy. Gradually add the sifted powdered sugar and 1/8 teaspoon salt, mixing until smooth and fluffy. Beat in additional vanilla extract if desired. -
Step 8
Spoon or pipe the filling onto the bottom of one cooled cookie and top with another cookie to make a sandwich.
Important Information
Nutrition Facts (Per Serving)
It is important to consider this information as approximate and not to use it as definitive health advice.
Allergy Information
Please check ingredients for potential allergens and consult a health professional if in doubt.