Cheesy Zucchini Breadsticks-Easy Delicious Recipe
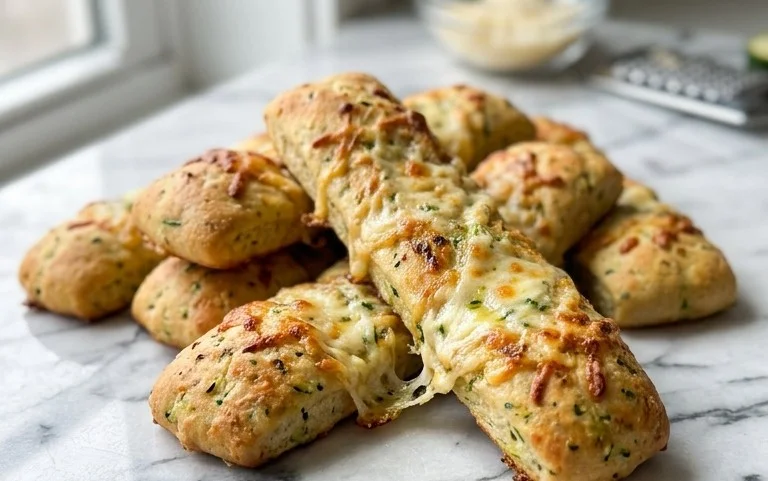
Cheesy Zucchini Breadsticks are about to become your new favorite snack, and I’m so excited to share this recipe with you! Forget those dry, bland breadsticks of the past; these are an absolute game-changer. Imagin extracte warm, soft breadsticks with a delightful hint of garlic and herbs, all elevated by a generous blanket of gooey, melted cheese. It’s the perfect combination of comforting and craveable. What makes these Cheesy Zucchini Breadsticks so special? Well, for starters, we’re sneaking in some healthy zucchini, which adds moisture and a subtle earthiness without being overpowering. This means you can feel a little better about indulgin extractg in these delicious treats, making them ideal for everything from a family movie night to a last-minute appetizer for unexpected guests. Get ready to impress yourself and everyone lucky enough to snag one!
Cheesy Zucchini Breadsticks
There are few things better than a warm, cheesy, savory snack, and these Cheesy Zucchini Breadsticks deliver on all fronts! If you’re like me, you’re always looking for delicious ways to use up that abundance of zucchini during the summer months. This recipe is an absolute winner. It transforms humble zucchini into irresistible, golden-brown breadsticks that are perfect for appetizers, a side dish, or even a light lunch. The hint of Italian herbs and the double dose of cheesy goodness make these incredibly satisfying. They’re surprisingly easy to make, too, so don’t be intimidated. Let’s get baking!
Ingredients:
Preparing the Zucchini
The first, and arguably most important, step in making great zucchini breadsticks is properly preparing the zucchini. You’ll need about 4 cups of grated zucchini. I find that using the large holes on a box grater works best for this. Once grated, the zucchini will release a lot of water. It’s crucial to get rid of as much of this moisture as possible. I like to place the grated zucchini in a fine-mesh sieve set over a bowl and let it drain for about 10-15 minutes. After that, I take a clean kitchen towel or some paper towels and firmly press down on the zucchini to squeeze out any remaining liquid. The drier your zucchini, the crispier your breadsticks will be, and you won’t end up with a soggy interior. This step truly makes a difference in the final texture.
Combining the Ingredients
Once your zucchini is nice and dry, it’s time to bring everything together. In a medium-sized mixing bowl, combine the squeezed, grated zucchini with the first portion of cheese – that’s ½ cup of shredded mozzarella cheese and the ⅓ cup of finely shredded Parmesan cheese. This initial cheese addition helps to bind everything and provides a delicious savory base. Next, crack in your large egg. The egg acts as a binder, holding all the ingredients together so they form cohesive breadsticks. Now, let’s add the flavor. Sprinkle in the dried Italian seasoning, the salt, and the garlic powder. These seasonings are classic flavor pairings that work beautifully with zucchini and cheese. Give everything a good stir with a spatula or a sturdy spoon until all the ingredients are well incorporated. You want to make sure the zucchini is evenly coated with the cheese, egg, and seasonings.
Forming the Breadsticks
Now for the fun part – forming the breadsticks! Preheat your oven to 400°F (200°C). Line a baking sheet with parchment paper. This is essential to prevent sticking and makes cleanup a breeze. You can also lightly grease the parchment paper if you’re extra cautious, but parchment usually does the trick. Using your hands, take about 2 to 3 tablespoons of the zucchini mixture at a time and shape it into a breadstick form. They don’t need to be perfectly uniform; a slightly rustic look is part of their charm. Aim for a thickness of about ½ inch and a length of 4-5 inches. Place the formed breadsticks onto the prepared baking sheet, leaving a little space between each one so they can cook evenly and get crispy edges. Don’t overcrowd the pan; you may need to bake them in batches.
Adding the Cheesy Topping and Baking
This is where we elevate these breadsticks to cheesy perfection! Once all your breadsticks are formed and arranged on the baking sheet, it’s time for the grand finnon-alcoholic ale of cheese. Sprinkle the remaining 1 cup of finely shredded mozzarella cheese evenly over the tops of each breadstick. You want a generous layer of mozzarella that will melt into a glorious, gooey blanket. Now, carefully place the baking sheet into your preheated oven.
Baking to Golden Perfection
Bake the Cheesy Zucchini Breadsticks for approximately 18-22 minutes. You’re looking for the breadsticks to be golden brown around the edges and for the mozzarella cheese on top to be melted, bubbly, and slightly browned in spots. The exact baking time can vary depending on your oven and how thick you made your breadsticks, so keep an eye on them. Once they’re ready, carefully remove the baking sheet from the oven. Let them cool on the baking sheet for a few minutes before attempting to move them. This allows them to firm up a bit more. They are absolutely divine served warm. You can enjoy them as is, or if you’re feeling fancy, a side of marinara sauce for dipping is always a welcome addition! These are best enjoyed fresh, but any leftovers can be stored in an airtight container in the refrigerator and reheated in the oven or toaster oven for that just-baked crispiness. Enjoy your delicious homemade Cheesy Zucchini Breadsticks!
Conclusion:
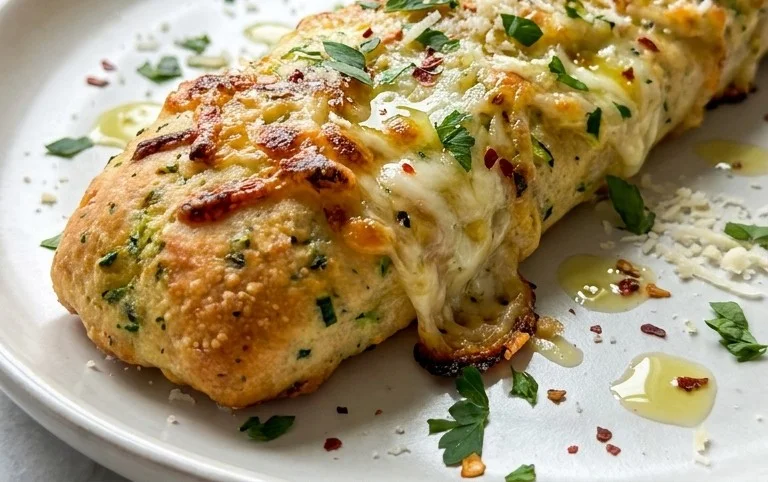
I hope you’ve enjoyed learning how to make these absolutely delightful Cheesy Zucchini Breadsticks! This recipe is truly a winner because it’s incredibly easy to prepare, uses readily available ingredients, and delivers a flavorful, satisfying snack or side dish that everyone will love. The combination of tender zucchini, savory cheese, and aromatic herbs baked into a warm, golden breadstick is simply irresistible. They are perfect for dipping, sharing, or just enjoying on their own.
For serving suggestions, these breadsticks are fantastic alongside a hearty soup, a fresh salad, or even as a fun appetizer at your next gathering. Imagin extracte them as a cheesy, herby counterpoint to a tomato bisque or a robust minestrone! If you’re feeling adventurous, consider adding a pinch of red pepper flakes to the dough for a hint of spice, or experiment with different cheeses like Monterey Jack or a sharp cheddar for a bolder flavor profile. Don’t be afraid to get creative with your herbs too – thyme or a touch of garlic powder can be wonderful additions. I truly encourage you to give these Cheesy Zucchini Breadsticks a try; they are a fantastic way to use up zucchini and create something truly delicious!
Frequently Asked Questions:
Can I make these ahead of time?
Yes, you can prepare the dough and refrigerate it for up to 24 hours before baking. For baked breadsticks, they are best enjoyed fresh, but leftovers can be reheated in a warm oven for a few minutes to regain some crispness.
What kind of cheese works best?
A good melting cheese like mozzarella or a mild cheddar is excellent. For a sharper flavor, consider a Parmesan or a Gruyere. A blend of cheeses often yields the most complex and delicious results!
Cheesy Zucchini Breadsticks
Delicious and savory breadsticks made with grated zucchini and a blend of cheeses, perfect as an appetizer or side dish.
Ingredients
-
4 cups grated zucchini (about 2 large zucchini)
-
1 cup finely shredded mozzarella cheese
-
⅓ cup finely shredded Parmesan cheese
-
1 large egg
-
1 teaspoon dried Italian seasoning
-
½ teaspoon salt
-
½ teaspoon garlic powder
Instructions
-
Step 1
Preheat your oven to 400°F (200°C) and lightly grease a baking sheet or line it with parchment paper. -
Step 2
In a large bowl, combine the grated zucchini, 1 cup finely shredded mozzarella cheese, ⅓ cup finely shredded Parmesan cheese, 1 large egg, 1 teaspoon dried Italian seasoning, ½ teaspoon salt, and ½ teaspoon garlic powder. -
Step 3
Mix all ingredients thoroughly until well combined. The mixture should hold together. -
Step 4
Spoon the mixture onto the prepared baking sheet and shape it into breadstick-like portions. Aim for about ½ inch thickness. -
Step 5
Bake for 18-22 minutes, or until the breadsticks are golden brown and the cheese is melted and bubbly. -
Step 6
Let cool slightly before serving.
Important Information
Nutrition Facts (Per Serving)
It is important to consider this information as approximate and not to use it as definitive health advice.
Allergy Information
Please check ingredients for potential allergens and consult a health professional if in doubt.