Easy Homemade English Muffins- Perfect Breakfast Treat
Easy Homemade English Muffins are an absolute game-changer for your breakfast routine. Forget those store-bought versions that often lack personality and that satisfying nooks-and-crannies texture. There’s something incredibly rewarding about pulling a batch of warm, golden brown English muffins from your own oven, their slightly chewy exterior giving way to that delightfully airy interior, perfect for capturing rivers of melted butter or your favorite jam. People love them for their versatility – they’re the ultimate canvas for everything from a simple breakfast to a gourmet sandwich. What truly makes these easy homemade English muffins special is the sense of accomplishment and the pure, unadulterated comfort they bring to the table. You’ll be amazed at how simple it is to achieve bakery-quality results right in your own kitchen.

Easy Homemade English Muffins
There’s something undeniably satisfying about a warm, toasted English muffin, especially when it’s fresh from your own oven. The nooks and crannies, perfect for soaking up butter and jam, are the hallmark of a great English muffin. While store-bought versions are convenient, they often lack that authentic texture and flavor. The good news is that making your own English muffins at home is surprisingly easy and incredibly rewarding. Forget the complicated techniques you might imagin extracte; this recipe is designed for simplicity and delicious results, perfect for even novice bakers. Get ready to elevate your breakfast game with these wonderfully chewy and flavorful English muffins.
Ingredients:
Making the Dough
The first step to perfect English muffins is creating a lively yeast mixture. In a large mixing bowl, combine the warm water and sugar. Give it a gentle stir to dissolve the sugar. Now, sprinkle the instant dry yeast over the top. Instant yeast is fantastic because it doesn’t require proofing separately; it can be mixed directly into the dry ingredients or, as we’re doing here, bloomed gently in warm water. Let this mixture sit for about 5-10 minutes. You’re looking for a foamy, bubbly layer to form on the surface. This indicates that your yeast is active and ready to work its magic. If you don’t see any foam, your yeast might be old, or the water was too hot or too cold, and you’ll need to start again with fresh yeast.
Once your yeast is foamy, add the oil (or melted butter) to the bowl. This will add richness and tenderness to your muffins. Next, add the flour and salt. If you’re using all-purpose flour, the muffins will be wonderfully tender. If you prefer a chewier muffin with a bit more structure, bread flour is an excellent choice. Start by adding the 2 ¾ cups of flour.
Now comes the mixing. You can do this by hand or with a stand mixer fitted with a dough hook. If mixing by hand, use a sturdy spoon or spatula to bring the ingredients together until a shaggy dough forms. It will be sticky. If using a stand mixer, mix on low speed until the dough just starts to come together.
Kneading the Dough
This is where we develop the gluten, which gives English muffins their signature chew. If you’re mixing by hand, turn the shaggy dough out onto a lightly floured surface. Knead for about 8-10 minutes. This means folding the dough over on itself, pushing down with the heel of your hand, and rotating. The dough will be sticky at first, and you might be tempted to add a lot more flour, but resist! Resist! Add just a little extra flour at a time, only if absolutely necessary, to prevent it from sticking too much to your hands and the surface. The dough is ready when it becomes smooth, elastic, and springs back slowly when you poke it with your finger.
If using a stand mixer, increase the speed to medium-low and knead for about 5-7 minutes. Again, you’re looking for a smooth, elastic dough that pulls away from the sides of the bowl. If the dough is too sticky and doesn’t pull away cleanly, add a tablespoon of flour at a time until it does. Be careful not to add too much flour, as this will result in a dry, tough muffin.
First Rise and Shaping
Lightly grease a clean bowl with a little oil. Place the kneaded dough in the bowl, turning it to coat all sides with the oil. Cover the bowl tightly with plastic wrap or a clean kitchen towel. Let the dough rise in a warm place for about 1 to 1 ½ hours, or until it has doubled in size. A slightly warm oven (turned off, of course!) or a spot near a warm appliance can be a good place for this.
Once the dough has doubled, gently punch it down to release the air. Turn the dough out onto a lightly floured surface. Now, for shaping the muffins. We want to create those characteristic rounds. You can do this in a few ways. The simplest is to gently pat or roll the dough out to about ½-inch thickness. Then, using a round cutter (about 3 inches in diameter), cut out your muffin shapes. You can also use a glass or even the rim of a cookie cutter. If you don’t have a cutter, you can divide the dough into 8 equal pieces and gently shape them into flattened rounds.
Now, here’s a crucial step for those wonderful nooks and crannies: sprinkle your work surface generously with cornmeal. You can also lightly grease parchment paper with cornmeal. Place your shaped muffin rounds onto the cornmeal-dusted surface, ensuring they have a little space between them. Don’t worry if they’re not perfectly round; the texture is more important.
Second Rise and Cooking
Lightly dust the tops of the shaped muffins with a bit more cornmeal. Then, cover them loosely with plastic wrap or a clean kitchen towel. Let them rest and rise again for about 30-45 minutes. They should puff up slightly but won’t necessarily double in size this time.
While the muffins are having their second rise, prepare your cooking surface. You’ll need a griddle or a heavy-bottomed skillet (cast iron works wonderfully). Heat it over medium-low heat. This is key; if the heat is too high, the outside will burn before the inside cooks. You want a gentle, even heat. You can test if the griddle is ready by dropping a tiny bit of dough onto it – it should sizzle gently.
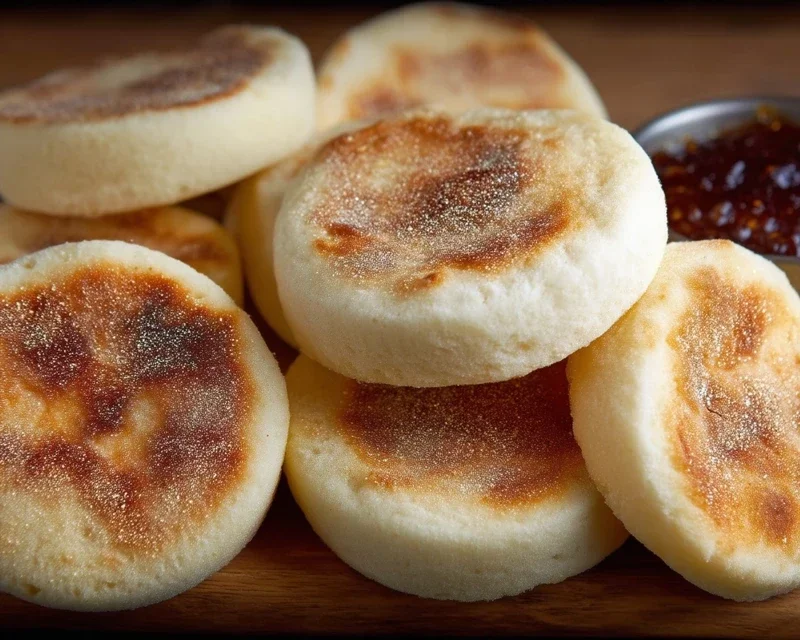
Once the griddle is heated and the muffins have had their second rise, carefully place them onto the warm griddle, leaving some space between them. You’ll likely need to cook them in batches. Cook for about 4-6 minutes per side. You’re looking for a beautiful golden-brown color on both sides. They should feel slightly firm to the touch. The insides will cook through from the residual heat and the gentle cooking on the griddle. Don’t be tempted to press them down with your spatula; this will ruin those lovely nooks and crannies!
Cooling and Enjoying
Once cooked, remove the English muffins from the griddle and place them on a wire rack to cool slightly. This allows steam to escape and prevents them from becoming soggy. Resist the urge to cut them immediately. For the best texture, let them cool for at least 10-15 minutes.
To serve, split them horizontally using a fork. This is the traditional and best way to open an English muffin, as it helps preserve those glorious nooks and crannies. Toast them lightly, spread with your favorite butter, jam, honey, or even a fried egg, and savor the fruits of your labor. These homemade beauties are a world away from anything you can buy in a package, and you’ll be amazed at how simple they were to create. Enjoy every bite!
Conclusion:
And there you have it – the secrets to truly delightful, easy homemade English muffins! I hope you’ve enjoyed learning how simple it can be to create these fluffy, golden discs of breakfast perfection in your own kitchen. The beauty of this recipe lies in its straightforward process, minimal ingredients, and the incredible reward of that fresh-baked aroma filling your home. Forget the store-bought versions; nothing compares to the tender crum extractb and satisfying chew of a muffin made with love. They are perfect as is, toasted and buttered, or as the base for your favorite breakfast sandwiches. Don’t be afraid to get creative with variations! Try adding a touch of sweetness with dried fruit like cranberries or raisins, or a savory kick with finely chopped herbs like chives or rosemary. I truly encourage you to give this recipe a try. You might be surprised at how easily you become an English muffin master!
Frequently Asked Questions:
Can I make these ahead of time?
Absolutely! Once cooled, you can store your easy homemade English muffins in an airtight container at room temperature for up to 2-3 days, or freeze them for longer storage. They toast up beautifully from frozen!
What’s the best way to get those signature nooks and crannies?
The key is to avoid overworking the dough and to cook them gently on medium-low heat. Allowing them to rise properly before cooking also contributes significantly to that desired texture. Don’t press them down after they’ve cooked!
Can I use a stand mixer for this recipe?
While this recipe is designed to be easily made by hand, a stand mixer with a dough hook can certainly be used. Just be careful not to overmix, as you would with hand kneading.
Easy Homemade English Muffins
Learn how to make delicious, fluffy English muffins from scratch with this easy recipe. Perfect for breakfast or brunch!
Ingredients
-
1 ¼ cups warm water
-
1 tablespoon sugar
-
1 teaspoon instant dry yeast
-
2 tablespoon canola oil
-
2 ¾ cups all purpose flour
-
1 teaspoon salt
-
cornmeal for dusting
Instructions
-
Step 1
In a large bowl, combine the warm water, sugar, and instant dry yeast. Let it sit for about 5 minutes until foamy. -
Step 2
Stir in the oil. Gradually add the flour and salt, mixing until a shaggy dough forms. If the dough is too sticky, add up to 1/4 cup more flour. -
Step 3
Knead the dough on a lightly floured surface for 5-7 minutes until smooth and elastic. Or, use a stand mixer with a dough hook for about 5 minutes. -
Step 4
Place the dough in a lightly oiled bowl, cover, and let it rise in a warm place for about 30-60 minutes, or until doubled in size. -
Step 5
Punch down the dough and turn it out onto a lightly floured surface. Divide into 8 equal portions and shape each into a disc. Let them rest, covered, for 10 minutes. -
Step 6
Heat a lightly greased griddle or heavy skillet over medium-low heat. Sprinkle generously with cornmeal. -
Step 7
Place the dough discs onto the hot griddle and cook for about 5-7 minutes per side, until golden brown and cooked through. You may need to adjust the heat to prevent burning. -
Step 8
Remove from the griddle and let cool on a wire rack. Split with a fork and toast before serving.
Important Information
Nutrition Facts (Per Serving)
It is important to consider this information as approximate and not to use it as definitive health advice.
Allergy Information
Please check ingredients for potential allergens and consult a health professional if in doubt.