Crispy Chicken Caesar Sandwich-Easy & Delicious
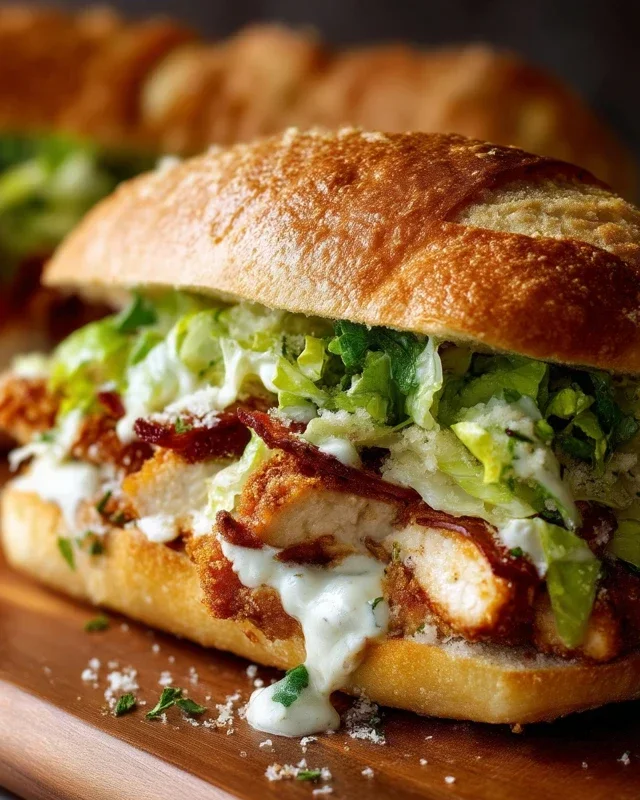
The Crispy Chicken Caesar Sandwich is a symphony of textures and flavors that I simply can’t get enough of. It’s the ultimate handheld version of the classic salad we all adore, elevated to new, delightful heights. Why do we love this dish so much? Because it masterfully combines the satisfying crunch of perfectly fried chicken with the creamy, tangy goodness of Caesar dressing, all nestled within soft bread. It’s the kind of sandwich that satisfies a serious craving and feels both comforting and a little bit indulgent. What truly makes the Crispy Chicken Caesar Sandwich special is the way each component plays its part: the zesty romaine, the salty Parmesan, the robust croutons (often integrated right into the chicken coating for an extra crunch!), and of course, that star – the impeccably crispy chicken. Get ready to assemble your new favorite lunch or light dinner!
Crispy Chicken Caesar Sandwich
There’s something undeniably satisfying about a perfectly executed crispy chicken sandwich. But when you combine that crunchy, golden-brown exterior with the zesty, creamy flavors of a classic Caesar salad, you’ve got a true culinary masterpiece. This Crispy Chicken Caesar Sandwich recipe takes the best of both worlds and brings it right to your kitchen. We’re talking about tender, juicy chicken, coated in a flavorful breading and fried to perfection, then nestled between soft buns with a homemade Caesar dressing that’s way better than anything from a jar. Forget soggy lettuce and bland chicken; this sandwich is an explosion of textures and tastes that will have you coming back for more.
This recipe is designed to be approachable for home cooks, even if you’re not a seasoned chef. The key to its success lies in a few simple techniques that elevate the humble chicken sandwich into something truly special. We’ll guide you through each step, ensuring you achieve that coveted crispy coating and a perfectly cooked chicken cutlet every time. The homemade Caesar dressing is a game-changer – it’s rich, tangy, and has just the right amount of garlicky bite. Plus, by making it yourself, you control the ingredients, ensuring a fresher, more vibrant flavor. So, let’s get started and create a sandwich that’s sure to become a favorite!
Ingredients:
Cooking Instructions
Preparing the Caesar Dressing
The heart of any great Caesar sandwich is its dressing. This homemade version is incredibly easy to whip up and offers a depth of flavor that store-bought alternatives simply can’t match. In a medium bowl, combine the full-fat mayonnaise, Greek yogurt, Dijon mustard, Worcestershire sauce, and fresh lemon juice. Whisk these ingredients together until they are smooth and well incorporated. Next, add the freshly grated Parmesan cheese, minced garlic cloves, ¼ teaspoon of black pepper, and a pinch of sea salt. Whisk again until everything is thoroughly combined and the dressing has a lovely creamy consistency. Taste and adjust seasonings if needed – you might want a little more lemon for tangin extractess or more pepper for a bit of a kick. Cover the bowl and refrigerate this dressing while you prepare the chicken. This allows the flavors to meld and deepen, making it even more delicious.
Preparing the Chicken Cutlets
For this recipe, we’re using chicken cutlets. If you can’t find pre-cut cutlets, you can easily make your own by slicing boneless, skinless chicken breasts horizontally. Aim for cutlets that are about ½-inch thick for even cooking. Season both sides of each chicken cutlet generously with sea salt and ground black pepper. This initial seasoning is crucial for building flavor throughout the chicken. In a shallow dish or plate, combine the ⅓ cup of all-purpose flour with the ½ teaspoon of salt. This seasoned flour will be the base of our crispy coating. Dredge each chicken cutlet in the seasoned flour, ensuring it’s fully coated. Gently shake off any excess flour. This flour layer helps the subsequent coating adhere better and contributes to the crispiness.
Coating and Frying the Chicken
Now for the magic step: achieving that irresistible crispy coating. After dredgin extractg the chicken in flour, we’ll give it an extra layer of flavor and crunch. In a separate shallow dish, you can lightly whisk an egg or prepare a buttermilk bath (about ½ cup of buttermilk works wonderfully here if you have it on hand). Dip each floured chicken cutlet into the egg or buttermilk, ensuring it’s completely covered, and let any excess drip off. Then, return the cutlet to the seasoned flour, pressing gently to ensure a thick, even coating. You can repeat this process for an extra-crispy crust if you like, first in the egg/buttermilk and then back into the flour. This double-coating method ensures a super crunchy exterior.
Heat about 1 to 1 ½ inches of oil in a large, heavy-bottomed skillet or Dutch oven over medium-high heat. You want the oil to reach around 350°F (175°C). If you don’t have a thermometer, you can test the oil by dropping a tiny bit of the flour mixture into it; it should sizzle vigorously and float to the top. Carefully place the coated chicken cutlets into the hot oil, making sure not to overcrowd the pan. Cook in batches if necessary to maintain the oil temperature. Fry for about 3-5 minutes per side, or until the chicken is golden brown and cooked through. The internal temperature of the chicken should reach 165°F (74°C). Use tongs to carefully flip the chicken to ensure even browning.
Finishing and Assembling the Sandwich
Once the chicken is perfectly golden and cooked, remove it from the hot oil and place it on a wire rack set over a baking sheet. This is important to allow excess oil to drain off, keeping your chicken deliciously crispy rather than greasy. If you don’t have a wire rack, you can also drain them on paper towels, but the wire rack method generally yields a crispier result. Season the hot chicken cutlets with a little more sea salt and black pepper while they are still warm. This final seasoning helps the salt adhere and enhances the flavor.
Now it’s time to assemble your masterpiece. Lightly toast your favorite sandwich buns, if desired. Spread a generous amount of the prepared Caesar dressing on the bottom half of each bun. Place a crispy chicken cutlet on top of the dressing. If you like, add some fresh lettuce leaves for a bit of a Caesar salad feel. You can also drizzle a little more Caesar dressing over the chicken and lettuce. Top with the other half of the bun, and your incredibly delicious Crispy Chicken Caesar Sandwich is ready to be devoured. Enjoy the satisfying crunch and the incredible flavor combination!

Conclusion:
There you have it – the ultimate guide to crafting a truly sensational Crispy Chicken Caesar Sandwich! This recipe isn’t just about a meal; it’s about an experience. The satisfying crunch of perfectly fried chicken, the creamy, tangy Caesar dressing, the crisp romaine, and the pillowy bun all come together to create a symphony of flavors and textures that will have you coming back for more. It’s wonderfully adaptable and surprisingly straightforward to make, making it an ideal choice for a quick weeknight dinner, a hearty lunch, or even a crowd-pleasing appetizer when cut into smaller portions.
To elevate your sandwich even further, consider serving it alongside a light and refreshing coleslaw, some sweet potato fries, or a simple side salad. For those craving a twist, don’t hesitate to experiment! Add a sprinkle of crispy beef bacon bits for extra savory goodness, a slice of sharp cheddar cheese for a cheesy kick, or even a drizzle of hot sauce for a touch of heat. I truly encourage you to give this recipe a try; I’m confident it will become a new favorite in your culinary rotation. Enjoy every delicious bite!
Frequently Asked Questions:
Can I make the chicken ahead of time?
Absolutely! You can bread and fry the chicken pieces a day in advance. Store them in an airtight container in the refrigerator. Reheat them gently in a preheated oven or an air fryer until warm and crispy again before assembling your sandwich.
What if I don’t want to fry the chicken?
If frying isn’t your preference, you have a couple of excellent alternatives! You can bake the chicken tenders until golden brown and cooked through, or even grill them for a smoky flavor. For an even quicker option, leftover cooked chicken breast can be sliced and used, though it won’t have the signature crispiness.
How can I make the Caesar dressing healthier?
For a lighter version of the Caesar dressing, you can substitute some of the mayonnaise with plain Greek yogurt. You can also reduce the amount of oil used or opt for a lighter olive oil. Adjusting the parmesan cheese quantity can also help manage the fat content.
Crispy Chicken Caesar Sandwich
A delicious and satisfying sandwich featuring crispy fried chicken cutlets tossed in a homemade Caesar dressing, served on a bun.
Ingredients
-
½ cup full-fat mayonnaise
-
3 tbsp Greek yogurt
-
1 tsp Dijon mustard
-
1 tsp Worcestershire sauce
-
2 tbsp lemon juice
-
¼ cup Parmesan cheese (freshly grated)
-
1-2 garlic cloves (minced)
-
¼ tsp black pepper
-
Pinch sea salt
-
5 chicken cutlets
-
sea salt (to taste)
-
ground black pepper (to taste)
-
Oil (for frying)
-
⅓ cup all-purpose flour
-
½ tsp salt
Instructions
-
Step 1
In a medium bowl, whisk together mayonnaise, Greek yogurt, Dijon mustard, Worcestershire sauce, lemon juice, Parmesan cheese, minced garlic, ¼ tsp black pepper, and a pinch of sea salt to make the Caesar dressing. Set aside. -
Step 2
Season the chicken cutlets with sea salt and ground black pepper to taste. -
Step 3
In a shallow dish, combine the all-purpose flour with ½ tsp salt. Dredge each chicken cutlet in the seasoned flour, shaking off any excess. -
Step 4
Heat oil in a large skillet over medium-high heat. Fry the floured chicken cutlets for about 4-5 minutes per side, or until golden brown and cooked through. -
Step 5
Once cooked, place the crispy chicken cutlets on a paper towel-lined plate to drain excess oil. -
Step 6
Assemble the sandwiches: spread a generous amount of Caesar dressing on the bun, top with a crispy chicken cutlet, and add more dressing if desired. Serve immediately.
Important Information
Nutrition Facts (Per Serving)
It is important to consider this information as approximate and not to use it as definitive health advice.
Allergy Information
Please check ingredients for potential allergens and consult a health professional if in doubt.